|
Although stereographic images can be made using a single camera, two
cameras on a tripod base are essential to ensure consistent parallel camera
orientation and to capture action (like waves, crowds, animals, etc).
We found it best to reset the camera image number on both cameras to "0"
at the beginning of each photography outing. From the start, batteries
should be recharged, disk space cleared, both cameras should should be
reset for standard bright, outdoor settings, and the maximum megapixal
setting should be used. On a typical weekend outing is was not uncommon
to take over 100 images per day (per camera). Only a small percentage
of these images were typically used.
After a stereo pair of images have been acquired, the construction of
a "successful" anaglyphic image requires image enhancement software
and an appropriate computer. Many computer graphics programs are available
that can convert images to anaglyphs, however other image enhancement
effect are needed for best results (such as resize, transform, brightness-contrast,
color management, etc.). All images on this website were made using Adobe
Photoshop (7.0) on a standard PC (with Windows XP). It is important to
keep track of "left" versus "right" images. We advise
setting up a directories using a specific place names, and then having
subdirectories labeled "left" and "right" for the appropriate
images. With practice, the numbers in both directories will be the same.
Save the completed anaglyphs in the parent directory. Be sure to keep
a back-up directory of all your original images.
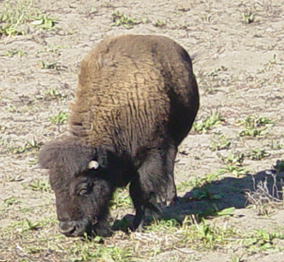
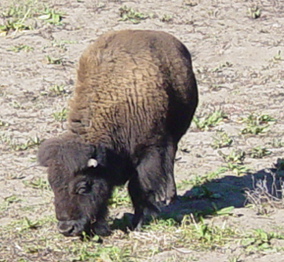
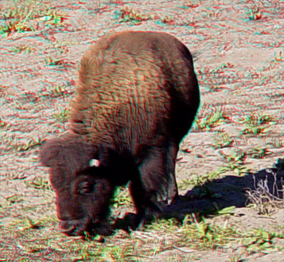
Below is an example of how an anaglyph is constructed. The bison below
was grazing in a pen in Golden Gate Park in San Francisco. To fit on this
web page, the images were cropped from their original full-size image.
All anaglyph images are processed with RGB levels (red-green-blue) and
saved as single-layer ".jpg" graphics. We also chose a resize
image standard of 800 pixels wide; height varies with constant proportions
for each images. |
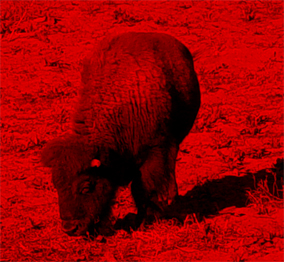
| Remove all "green" and "blue" from the left image.
(In Photoshop, use the "Image - Adjustments - Levels" menu. Under
the "Channel" bar change the RGB setting to "Green",
then reset the "Output Levels" from "255" to "0".
Repeat this step for "Blue" - then hit the "OK" button
to hold the red image. |
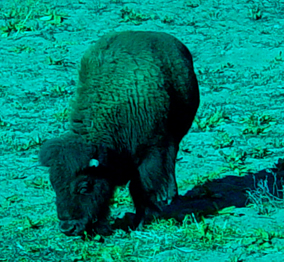
Remove all "red" from the right image. (In Photoshop,
use the "Image - Adjustments - Levels" menu. Under the "Channel"
bar change the RGB setting to "Red", then reset the output level
from "255" to "0" - you should be left with a "cyan"
image (the combination of "green" and "blue" levels). |
 |
Select and copy the red image and paste it as a new layer on top of the
cyan image. You must make the red layer transparent so the cyan image
is visible. In Photoshop, this can be done on the "Layers" window by changing the bar setting from "Normal" to "Screen."
It can also be done by changing the opacity of the top red layer from
"100%" to "50%." Once the image is transparent, you
can move, transform, readjust levels, contrast, or other settings to make
to most visually pleasing anaglyph (using red-and-cyan glasses).
When the image is ready, choose "Flatten Image" under the "Layers"
menu and then "Save As" a .jpg image with a new name. |
With practice, generating anaglyphic images can be a fast
process. Be aware it typically takes more time to process the images as
it does to go out and take the original photography. It will save time by
having an image naming system and computer directory plan before you start
generating anaglyphs. There are many other applications, camera configurations,
and software that utilize anaglyphic and other forms of stereographic imaging.
Many of these can be found by searching on the World Wide Web.
3D photographer's comment—note that spacing of the cameras ranged from about 1 to 20 meters for this series of stereo anaglyphic images. (Focus left camera on nose, "click!" walk 5 to 10 paces to right, focus right camera on nose, "click!" ) Make anaglyph, trim foreground if necessary. Try different scales for distant features. The greater the distance apart the cameras, the more exaggerated the relief will be—at a distance. With increasing distance between cameras, objects in the foreground are lost to distortion, so trimming is usually essential. For examples, see the Mount Rushmore National Memorial images.
Viewing 3D Anaglyphic Photography
It is our experience that the best viewing of our 3D images, (particularly landscapes or objects in natural lighting) depends on the quality and type of glasses, and the environment of viewing. Most images are examined on a computer screen, and little can be done (without effort) to change the brightness of an image quickly and easily. Printed images can be moved to different lighting setting, but image quality depends on the type of paper and print quality.
Glasses can make a difference. Cheap glasses with paper frames given out at 3D movies work fine, however, having investigated the varieties available (low to high end), we find that more transparent varieties of cyan films work best. We found that Red-and-Green, and Red-and-Blue filters make viewing difficult, and image quality is lost. Red filters are fairly uniform, but the quality of cyan varies significantly. Cyan filters that transmit slight amount of red seem to work best on this anaglyph image process. Pale cyan 3D anaglyph and anachrome style glasses have worked best with our image development. Who know's what the future of the science will bring? For more information and, search the Web for 3D imaging sciences organizations and societies. There are many methods of creating anaglyphs and each variety works best with tailored glasses specific to the method. Our "non-technical" means of finding what worked best for us was purely "trial and error." In general, brighter light really makes a difference. |

